What Is Flush Carpentry
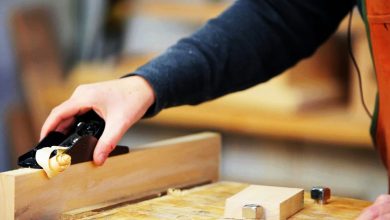
Flush carpentry refers to the technique of making the head of a nail sit flush inside the material.
This involves countersinking the nail so that it is level with the surface of the wood, creating a smooth and seamless appearance.
By utilizing flush carpentry techniques, carpenters can ensure that the nails are not visible, reducing the need for additional finishing work and resulting in a clean and polished final product.
Did You Know?
1. Flush carpentry is a woodworking technique where the surfaces of different wood pieces are aligned completely flush with no visible gaps or offsets.
2. The origins of flush carpentry can be traced back to ancient Egypt, where highly skilled craftsmen used this technique to construct intricate furniture and elaborate architectural features.
3. The art of flush carpentry reached its peak during the Renaissance period, with master carpenters using it to create stunning paneling, detailed door frames, and ornate ceilings in grand palaces and cathedrals.
4. Flush carpentry requires meticulous attention to detail and precision, as even the slightest error in measuring or cutting can ruin the entire piece. Therefore, it demands a high level of expertise and patience from carpenters.
5. Today, flush carpentry is widely used in modern interior design, enhancing the aesthetic appeal of homes and buildings. From sleek, seamless cabinetry to hidden doors and secret compartments, this technique continues to be a hallmark of fine craftsmanship.
Understanding Flush Carpentry Techniques
Flush carpentry is a technique that focuses on achieving a seamless finish in woodworking projects by ensuring that the heads of nails sit perfectly flush inside the material being worked on. The aim is to create a smooth surface without any visible protrusions, allowing for a clean and professional look.
When using flush carpentry techniques, carpenters pay close attention to the position of the nails and use the appropriate tools to ensure that they are driven in just deep enough to sit flush, without causing damage to the surrounding material. This requires a high level of precision and skill.
In addition to nails, there are also other fasteners that can be used in flush carpentry, such as screws or dowels. The goal remains the same – to create a finished product that is free of any visible fasteners or imperfections.
It is important to note that flush carpentry is not just about the appearance of the finished product, but also about ensuring the structural integrity of the project. By carefully securing the materials together and making sure the fasteners are properly hidden, flush carpentry provides a durable and long-lasting result.
Essential Terminology in Carpentry
To fully understand the world of carpentry, it is crucial to become familiar with some key terminology. This will not only help in comprehending instructions and discussions related to woodworking but will also enable effective communication with professionals in the field. Here are some essential terms to know:
- Cross-cut: This refers to a type of cut that runs across the grain of the timber. It is often used in carpentry to create smaller pieces of wood from larger ones.
- Cupping: Cupping occurs when the edges of a board bend with the grain, forming a concave shape. This can happen due to changes in moisture content or improper drying techniques.
- Dado rail: A decorative molding often found in period-style buildings. It is typically positioned on walls at a height where it can serve as a support for a dado panel.
- Dovetail joint: A right angle joint that is commonly used in furniture and drawers. It is known for its strength and durability.
- Dowel: A straight round wooden peg used to align and hold timbers together. It provides extra stability and reinforcement.
- Dressed size: Refers to the finished size of timber after being machined or planed. It is the size that customers receive when purchasing timber for their projects.
- Epoxy glue: A strong adhesive that can bond practically anything. It is commonly used in carpentry to ensure a secure and lasting connection between materials.
- Estimating: The process of calculating the required materials, costs, and pricing for a carpentry project. Estimating plays a crucial role in ensuring the project stays within budget.
- Face: Refers to the visible surface of finished timber. Carpenters pay close attention to the face during the construction process to ensure a polished appearance.
- Fascia and soffit boards: These boards are attached to the bottom of the roof structure to form the eaves and fix gutters. They serve both functional and aesthetic purposes.
Different Types of Joints in Carpentry
Joints play a vital role in carpentry, as they determine the strength and stability of a structure. Different types of joints are used depending on the purpose and design of the project. Here are some common joints in carpentry:
- Finger joint: This technique uses tapered square fingers to join materials lengthways. It provides a strong connection and is often used in furniture construction.
- Mortise and tenon joint: A square hole (mortise) is cut to allow a projecting piece (tenon) to slide into it. This joint is known for its strength and is commonly used in timber framing.
- Tongue and groove joint: This method involves creating a groove on one piece of timber and a corresponding tongue on another piece. When joined, these interlocking features provide strength and stability.
- Dovetail joint: As mentioned earlier, this joint involves interlocking angled projections and is renowned for its durability.
- Pocket hole: A hole is drilled at an angle to allow screws to be inserted for butt joints. This joint is commonly used in cabinetmaking and other applications where strength and speed of assembly are crucial.
It is important for carpenters to have a solid understanding of different joint types to ensure the structural integrity of their projects.
Important Tools and Materials in Carpentry
Carpentry requires a variety of tools and materials to bring projects to life. Let’s explore some of the important ones:
-
Hand planes: These tools are used for smoothing and flattening rough or uneven timber surfaces. They help achieve a sleek finish and prepare the wood for further shaping.
-
Jigsaw: A power tool used to cut circular and intricate shapes. Jigsaws are versatile and can be used with different types of materials.
-
Plunge router: This router has telescopic legs that allow the cutter to be pushed down into a workpiece when cutting from the edge. It provides precise and controlled cuts.
-
Drill bits: These are essential for boring holes in wood and other materials. Different drill bits are used for specific purposes, such as pilot bits for pre-drilling holes for screws.
-
Try square: A type of square with a flat steel blade held at a perfect 90° angle and held in a wooden handle. It is used to ensure accurate right angles when measuring and marking.
-
Undercutting tools: These specialized tools are used to remove material from the edge of timber, allowing it to fit snugly into a joint. Undercutting is necessary for achieving clean and precise joints.
-
Veneer: A thin layer of wood glued to another material. It is commonly used in cabinetry and furniture making to create a decorative finish.
Common Woodworking Terms and Definitions
To navigate the world of carpentry, it is essential to be familiar with common woodworking terms and their definitions. Here are a few worth knowing:
Grain: Refers to the fibers of the wood and their direction. Understanding the grain is crucial when making cuts and joints to ensure the strength and appearance of a piece.
Green lumber: Fresh timber that has not dried. Green lumber tends to have a higher moisture content and requires proper drying before use to prevent warping or other issues.
Plywood: A man-made sheet material made of opposing layers and known for its strength and resistance to warping. Plywood is widely used in construction and furniture making.
Pitch: Refers to the angle of rise in degrees from the horizontal, used in staircase and roof construction. Proper pitch is essential for the structural integrity and functionality of these elements.
Warp: Describes when timber bends or twists along its grain improperly, usually due to incorrect storage or drying. Proper handling and storage can help prevent warping.
Varnish: A liquid used to finish timber, often transparent but also available in different colored effects. Varnish provides a protective layer and enhances the appearance of wood.
These are just a few examples of the numerous terms and definitions that exist in the world of carpentry, and understanding them is crucial for successful woodworking projects.
Additional terms and definitions in carpentry include:
- Joist: A horizontal structural member used to support the floor or ceiling.
- Chamfer: A beveled edge often used for decorative purposes.
- Miter joint: A joint formed by cutting each of two parts to be joined, usually at a 45-degree angle, and fitting them tightly together.
- Dovetail joint: A strong joint made by interlocking pins and tails.
- Wood glue: A strong adhesive specifically designed for use with wood materials.
By familiarizing oneself with these terminologies, carpenters can effectively communicate and execute woodworking projects, creating stunning and durable pieces of woodworking art.
Check this out:
Frequently Asked Questions
What is flushing in construction?
Flushing in construction refers to the process of purging a building’s interior with forced air before it is occupied. This technique aims to eliminate or minimize the presence of pollutants that were inadvertently introduced indoors during the construction phase, such as volatile organic compounds (VOCs) and particulate matter. By performing a building flush, the air is pumped out and replaced, creating a cleaner and healthier environment for future occupants. This process ensures that the indoor air quality meets necessary standards, reducing potential health risks and creating a fresh start for the building’s occupants.
What is the difference between proud and flush?
The distinction between proud and flush lies in the position of the ovens in relation to the cabinetry. Proud mounts result in ovens that extend slightly beyond the cabinetry, allowing the appliance frame and door to be visible. This creates a distinct visual separation between the oven and surrounding cabinetry. On the other hand, the flush mount has the oven front aligned with the surrounding cabinetry, creating a seamless and streamlined look where only the appliance handle protrudes from the cabinetry. By understanding these differences, one can make an informed decision when it comes to selecting the desired aesthetic for their kitchen design.
What does flush the wall mean?
Flush the wall means that a surface is positioned exactly even with an adjoining surface, forming a seamless plane. This term is commonly used to describe when a door or window is installed in such a way that it aligns seamlessly with the surrounding wall or floor. In this context, flush implies that there is no protrusion or indentation, resulting in a smooth and uniform appearance. By ensuring that the door or window is flush with the wall, the overall aesthetic of the space is enhanced, creating a cohesive and visually pleasing design.
What is a flush in slang?
In slang, a “flush” refers to someone who is financially well-off or has a significant amount of money. It is commonly used to describe a person who is feeling prosperous or financially secure. It can be attributed to someone who has recently been paid or has come into a considerable sum of money. When someone is feeling “flush,” it implies that they have the means to spend or enjoy their wealth comfortably.