How to Strike an Arc in Welding
To strike an arc in welding, there are two commonly used methods: the scratching method and the tapping method.
The scratching method involves dragging the electrode across the work surface until an arc is established.
This technique is useful when welding on a flat or horizontal surface.
On the other hand, the tapping method involves lightly tapping the electrode against the work surface to create the arc.
This method is typically used when welding on an overhead or vertical surface.
Before striking the arc, it is important to ensure safety by wearing a face shield to protect the eyes and face from sparks and debris.
Additionally, the work surface should be free from dirt and scale, as they can interfere with the arc formation.
Once the arc is struck, the welder needs to maintain proper technique to produce a high-quality weld.
This includes controlling the heat input, maintaining the correct interpass temperature, and ensuring proper penetration.
Various welding terms such as root pass, key hole, burnthrough, hot pass, wagon tracks, filler passes, cover pass, weld groove, back gouging, preheating, postheating, and guided-bend specimen are all important aspects to consider when striking an arc and completing a successful weld.
In summary, to strike an arc in welding, one can use the scratching method by dragging the electrode across the work surface or the tapping method by lightly tapping the electrode against the surface.
Safety precautions, such as wearing a face shield and working on a clean surface, should be followed.
Proper technique and consideration of various welding terms are crucial for achieving a successful weld.
Check this out:
Did You Know?
1. Striking an arc in welding requires a process called “scratching”, where the electrode momentarily touches the workpiece and then is quickly lifted to create the arc.
2. Did you know that the color of the arc in welding can indicate the temperature? A blue arc indicates higher temperatures, while a yellow arc indicates lower temperatures.
3. In underwater welding, a specialized technique called “wet welding” is used to strike an arc. This process involves using a special electrode that doesn’t require a shielding gas.
4. One of the key factors in striking an arc is maintaining the right distance between the electrode and the workpiece. Too long of a distance can cause the arc to become unstable, while too close can result in the electrode sticking to the workpiece.
5. Striking an arc in welding can create a phenomenon called “arc blow”, where the arc is deflected away from its intended path due to magnetic fields. To counter this, welders can use various techniques like changing the direction of travel or using magnetic arc blow devices.
Arc Striking Methods
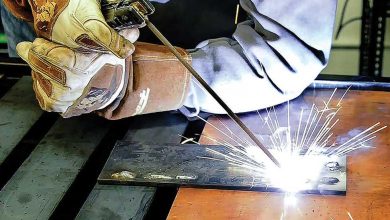
One of the fundamental skills in welding is the ability to strike an arc, which starts the welding process. There are two common methods for striking an arc:
-
Scratching method: In this method, the electrode is brought close to the workpiece and then scratched against it. The friction generated between the electrode and the workpiece creates the required heat to initiate the arc.
-
Tapping method: In this method, the electrode is brought close to the workpiece and then tapped lightly against it. The tapping action helps in initiating the arc by creating a brief contact between the electrode and the workpiece.
These methods are crucial in starting the welding process and should be practiced to ensure a successful weld.
Note: Proper safety precautions, such as wearing protective gear and ensuring a safe work environment, should always be followed while striking an arc.
The Scratching Method
In the scratching method, the electrode is held near the workpiece surface and then dragged or scratched against it. This creates a high current density at the tip, which initiates the arc. Once the arc is established, the electrode is withdrawn slightly to achieve the desired arc length.
It is important to note that the scratching method should only be used on flat or horizontal surfaces. It is not suitable for vertical or overhead welding.
- The electrode is held near the workpiece surface and scratched against it
- High current density at the tip initiates the arc
- The electrode is withdrawn slightly to achieve desired arc length
- Flat or horizontal surfaces are suitable for the scratching method
The Tapping Method
The tapping method is a technique used in welding that involves touching the electrode to the workpiece surface with a quick tap or light strike. This action creates a momentary short circuit, which ignites the arc. To establish the appropriate arc length, the electrode is then pulled back slightly.
The tapping method is particularly suitable for vertical or overhead welding as it reduces the risk of the electrode sticking to the workpiece.
To summarize:
- The tapping method involves a quick tap or light strike of the electrode on the workpiece surface.
- This creates a momentary short circuit that ignites the arc.
- The electrode is then pulled back slightly to establish the appropriate arc length.
- The tapping method is more suitable for vertical or overhead welding, minimizing the risk of electrode sticking.
“The tapping method is especially effective in reducing the risk of the electrode sticking to the workpiece during vertical or overhead welding.”
Safety Gear: Face Shield
When striking an arc in welding, it is crucial to wear appropriate safety gear to protect your eyes and face. One essential piece of equipment is a face shield.
A face shield provides comprehensive protection by covering the entire face, including the eyes, from sparks, spatter, and harmful ultraviolet (UV) and infrared (IR) radiation emitted during welding. It is important to choose a face shield that is compatible with your welding helmet or goggles for maximum protection.
Always wear the face shield properly and ensure that it is in good condition without any cracks or damage. Regularly clean it to maintain visibility during welding.
Surface Preparation: Dirt and Scale
Before striking an arc, it is crucial to prepare the workpiece by cleaning off any dirt and scale. Dirt and scale can interfere with the welding process and compromise the quality of the weld.
Use a wire brush or grinding tool to remove any loose dirt, rust, or scale from the surface to be welded. Pay particular attention to the joint area where the welding will take place. Ensuring a clean surface will help establish a stable arc and promote proper fusion between the base metals.
Monitor the workpiece throughout the welding process to prevent the accumulation of dirt and scale. Regularly clean the surface as necessary to maintain optimal welding conditions.
Key Steps: Root Pass and Burnthrough
When striking an arc in welding, two key steps are essential for achieving a strong and reliable weld: the root pass and avoiding burnthrough.
Root Pass
The root pass is the first weld bead that penetrates the base metal and serves as the foundation for the weld joint. Striking a solid arc is essential in achieving proper fusion and penetration.
To create a sound root pass, position the electrode at the base of the joint with the correct angle and alignment. It is important to strike the arc using the preferred method.
Maintain a consistent travel speed throughout the welding process to ensure a quality root pass. Pay attention to the size and shape of the weld pool as it is an indicator of proper penetration.
Burnthrough
Burnthrough is a welding defect that occurs when the base metal melts or penetrates excessively, leading to the formation of a hole or thinning in the workpiece. It is crucial to be cautious when striking an arc to prevent burnthrough, as it compromises the overall strength of the weld.
To avoid burnthrough, it is essential to control the arc length and adjust the welding parameters, including current and travel speed, to regulate the heat input. This can be achieved by employing proper technique and maintaining control throughout the welding process. By doing so, the desired weld pool size can be preserved, effectively preventing burnthrough.
Additional Techniques: Wagon Tracks and Filler Passes
Once the root pass is complete, additional techniques can be employed to reinforce the weld and achieve the desired strength and appearance. Two commonly used techniques are wagon tracks and filler passes.
Wagon Tracks
Wagon tracks are a welding technique that involves oscillating the electrode slightly from side to side. This technique has several benefits. First, it creates a wider weld bead, which in turn increases the overall strength of the joint. Additionally, the back-and-forth movement of the electrode helps distribute heat evenly, ensuring proper fusion between the weld metal and the base metal.
Wagon tracks are particularly useful when welding thicker materials or when additional reinforcement is required.
Filler Passes
Filler passes are weld beads applied after the root pass to fill in the joint and build up the weld. These passes add more material while maintaining proper penetration and fusion.
To perform filler passes, start by striking an arc near the end of the root pass and continue welding along the joint, slightly overlapping with each pass. It is important to consistently control the arc length and travel speed to ensure a uniform and strong weld. Repeat the process as necessary until the desired weld size is achieved.
Key steps for performing filler passes:
- Strike an arc near the end of the root pass.
- Weld along the joint, slightly overlapping with each pass.
- Consistently control the arc length and travel speed.
- Repeat as necessary to achieve desired weld size.
“Filler passes are essential in filling the joint and building up the weld while ensuring proper penetration and fusion.”
Maintenance and Testing: Preheating and Guided-Bend Specimen
Maintaining proper welding conditions and ensuring the quality of the weld is crucial for successful and reliable results. Two maintenance-related techniques that can be used are preheating and testing with a guided-bend specimen.
-
Preheating: Preheating involves heating the base metal before the welding process. This helps to reduce the risk of cracking and improves the overall quality of the weld. It is especially important when working with materials that have a high carbon content or are prone to distortion.
-
Guided-bend specimen testing: This testing method involves bending a specific section of the weld to evaluate its ductility and integrity. It helps to identify any potential flaws or defects in the weld. By performing this test, welders can ensure that the weld meets the required standards and specifications.
“Maintaining proper welding conditions and ensuring the quality of the weld is crucial for successful and reliable results.”
Preheating
Preheating is a crucial step in the welding process. Its main purposes are to remove residual moisture from the base metal, minimize the risk of cracking, and enhance the material’s weldability.
This technique is especially vital when dealing with thick materials or those containing a high carbon content. It is also necessary for materials that are prone to hydrogen cracking.
By preheating, we ensure a better quality weld and significantly reduce the chances of defects. It helps to create a stable and strong bond between the weld and the base metal.
- Preheating helps to eliminate moisture from the base metal.
- It reduces the risk of cracking during the welding process.
- The technique improves the overall weldability of materials.
- It is particularly important for welding thick materials.
- It is beneficial for high carbon content materials.
- Preheating is necessary for preventing hydrogen cracking.
“Preheating plays a pivotal role in welding by eliminating moisture, preventing cracking, and enhancing weldability.”
Guided-Bend Specimen
A guided-bend specimen is a test piece that undergoes a bending force to assess the quality and soundness of a weld. It is a standardized test used to verify that the weld meets required specifications and can endure service conditions.
Upon completion of the welding process, a sample weld can be cut and shaped into a guided-bend specimen. The specimen is then bent to a specific angle to evaluate the weld’s ductility and absence of defects.
This test aids in identifying potential issues with the welding process, enabling necessary adjustments or improvements to be implemented.
Conclusion
Striking an arc in welding is a crucial skill that requires both technique and knowledge. Understanding the different methods, wearing the appropriate safety gear, and properly preparing the workpiece are essential steps for successfully striking an arc.
To ensure a smooth arc strike, here are some important considerations:
-
Method: Familiarize yourself with the various arc striking techniques, such as scratch-start, tap-start, or lift-start. Each method has its own advantages and best applications.
-
Safety Gear: Always prioritize safety by wearing the appropriate protective equipment. This includes a welding helmet with a proper shade filter, safety glasses, gloves, and appropriate clothing to shield against sparks and heat.
-
Workpiece Preparation: Preparing the workpiece is vital for a successful arc strike. Make sure the metal surface is clean, free from rust, paint, or any contaminants that could interfere with the arc. Properly clamp or secure the workpiece to prevent movement during welding.
Remember the following blockquote for successful arc striking:
“Practice, practice, practice. Continuously honing your welding skills will improve your ability to consistently strike a perfect arc.”
Keep practicing and refining your welding techniques to ensure a successful arc strike every time.
Frequently Asked Questions
What is the proper technique for striking an arc in SMAW?
When initiating a SMAW operation, it is crucial to follow the proper technique for striking an arc. The electrode should be first brought into contact with the workpiece, similar to lighting a match, and then gently pulled away. If the arc immediately lights up and extinguishes, it indicates that the electrode was pulled too far away from the base metal. Achieving the perfect balance between maintaining contact and withdrawing slightly is key to successfully striking and maintaining an arc in SMAW.
What are the two ways to start an arc in welding?
There are two commonly used methods to start an arc in welding: “Tap Starting” and “Scratch Starting”. The first method involves touching the electrode against the work momentarily to establish the electrical circuit and then quickly raising it to create the arc. This careful maneuver is crucial to prevent welding the rod to the work. The second method, known as “Scratch Starting”, involves scratching the electrode against the work to initiate the arc. This method requires skill and precision to strike the arc successfully without damaging the electrode or the workpiece. Mastering both techniques allows welders to effectively start an arc and initiate the welding process flawlessly.
1. What are some common techniques for striking an arc in welding, and how can they be executed effectively?
There are several common techniques for striking an arc in welding. One technique is known as “scratch start,” where the electrode tip is scratched against the workpiece until an arc is formed. This method is commonly used in stick welding. To execute it effectively, the welder needs to ensure that the electrode makes good contact with the workpiece to create a stable arc. It is essential to scratch the electrode in a controlled manner to prevent excessive sparking and damage to the electrode tip.
Another technique is “high-frequency start,” typically used in TIG (Tungsten Inert Gas) welding. In this method, a high-frequency current is applied between the electrode and the workpiece, creating an arc. It is essential to keep the electrode close to the workpiece during the high-frequency start. This technique is considered more effective and precise than the scratch start method.
Regardless of the technique used, executing the arc effectively requires a steady hand, proper eye protection, and a good understanding of the equipment. Practice, experience, and maintaining the correct distance and angle between the electrode and workpiece also play a vital role in striking a successful arc.
2. What safety precautions should be taken when striking an arc in welding, and how can they help prevent accidents or injuries?
When striking an arc in welding, several safety precautions should be followed to prevent accidents or injuries. Firstly, it is crucial to wear appropriate personal protective equipment (PPE) like welding helmets with a proper shade level, safety glasses, flame-resistant clothing, welding gloves, and steel-toed boots. These PPE items provide protection against harmful ultraviolet and infrared radiation, sparks, spatter, and other potential hazards.
Secondly, the work area should be well-ventilated to avoid exposure to fumes and gases produced during the welding process. Proper ventilation helps to minimize the risk of inhalation of toxic substances and prevents respiratory issues. Additionally, it is important to ensure the workpiece is clean from flammable or combustible materials, as this reduces the risk of fires or explosions.
By following these safety precautions, welders can significantly reduce the possibility of accidents or injuries. Wearing protective gear shields the welder from direct exposure to radiation and flying sparks, preventing eye damage and burns. Proper ventilation safeguards the welder’s respiratory health, minimizing the risk of inhalation of harmful fumes. Finally, ensuring a clean work area decreases the likelihood of fires or explosions, enhancing overall shop safety. These precautions are essential in keeping welders safe during the arc striking process.