How to Make a Vase on a Pottery Wheel
To make a vase on a pottery wheel, you will need a pottery wheel, clay, and basic pottery tools.
Start by preparing your clay and wedging it to remove any air bubbles.
Then, center the clay on the pottery wheel and create a hole in the center using your thumbs.
Use your hands and water to shape the clay into the desired vase form.
Trim excess clay from the bottom and create a foot for stability.
Use a hand-carved plaster mold to create unique designs or patterns on the surface of the vase.
Once the design is complete, let the vase dry slowly to prevent cracking.
Finally, fire the vase in a kiln to harden the clay and bring out its vibrant colors.
Check this out:
Did You Know?
1. The oldest known pottery wheel was discovered in Mesopotamia, dating back to around 4,500 BC, revealing that this technique has been used for thousands of years to create vases and other ceramic objects.
2. To make a vase on a pottery wheel, potters use various specialized tools, such as a “rib,” which helps shape the clay and smooth its surface. These ribs can be made from different materials, including wood, metal, and even bones.
3. While many vases are made on a pottery wheel, some talented potters can create them without the use of a wheel. This technique, known as “hand-building,” involves shaping clay by hand and is particularly popular among artists who prefer a more organic and irregular aesthetic.
4. Vases made on pottery wheels often take advantage of a phenomena called “sgraffito,” which involves scratching through one colored layer of clay to reveal a contrasting color underneath. This technique allows potters to create intricate and detailed designs on the surface of the vase.
5. In ancient times, vases were not just decorative objects. They were often used for practical purposes, such as storing grain or preserving food. However, as societies evolved, vases became more valued for their aesthetic qualities, and their designs began to incorporate intricate patterns and elaborate sculptures, rendering them true works of art.
Pottery Wheel Basics
Pottery wheels have been used for centuries to create beautiful ceramic pieces. When starting the process of making a vase on a pottery wheel, it is essential to have a sturdy and well-functioning wheel. Get to know the different parts of the wheel, including the wheel head, foot pedal, and centering platform. Also, gather the necessary tools such as a sponge, wire cutter, and clay carving tools. Remember, having a solid understanding of the basics will greatly enhance your pottery wheel experience.
- Ensure you have a sturdy pottery wheel in good working condition.
- Familiarize yourself with the various parts of the wheel, such as the wheel head, foot pedal, and centering platform.
- Gather the necessary tools like a sponge, wire cutter, and clay carving tools.
Creating A Hand-Carved Plaster Mold
One way to create a uniform and symmetrical vase shape is by using a hand-carved plaster mold.
Here are the steps to follow:
- Choose a vase design that you would like to replicate.
- Prepare a block of clay large enough to hold the entire vase.
- Press the clay into the mold, ensuring even distribution within the space.
- Gently lift the mold off the clay, leaving a negative shape of your vase.
- Allow the clay to slightly harden before proceeding to the next step.
Remember to be careful while lifting the mold to avoid damaging the clay.
Additionally, it is important to note that this method requires hand-carving the plaster mold.
Pressing And Filling Clay
Once you have your plaster mold ready, it’s time to prepare the clay. Choose a suitable clay body for your vase, considering its color and texture. Begin by wedging the clay to improve its workability and remove any air bubbles.
Take a piece of clay and throw it onto the pottery wheel head, patting it down to secure it in place. Use your hands and fingers to shape the clay, gradually pulling it upwards to create the vase shape. Apply gentle pressure to the clay as it spins on the wheel to maintain control over the form. If necessary, add more clay to build up the walls of the vase to your desired thickness.
- Choose a suitable clay body for your vase, considering its color and texture.
- Wedge the clay to improve workability and remove air bubbles.
- Throw a piece of clay onto the pottery wheel head and secure it in place.
- Shape the clay by pulling it upwards to create the vase shape.
- Apply gentle pressure to maintain control over the form.
- Add more clay if necessary to build up the walls to desired thickness.
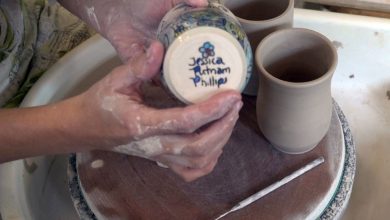
Cleaning And Smoothing The Vase
Once the vase is formed, it is crucial to clean and smooth the surface for a polished finish. Use a sponge and water to remove any excess clay particles on the surface. Pay close attention to the rim and bottom of the vase, ensuring they are nicely rounded and even. Additionally, clay carving tools can be utilized to add intricate details or textures, such as swirls or lines, which can greatly enhance the aesthetic appeal of the vase. Take your time during this step to create a flawless finish.
- Use a sponge and water to remove excess clay particles.
- Pay attention to the rim and bottom of the vase for evenness.
- Consider using clay carving tools for intricate details.
- Take your time to achieve a flawless finish.
“Create a flawless finish by cleaning and smoothing the surface of the vase with water and a sponge. Pay attention to the rim and bottom, ensuring they are nicely rounded and even. Don’t forget to add intricate details or textures with clay carving tools, such as swirls or lines, to enhance the overall aesthetic appeal. Take your time during this step to achieve a flawless finish.”
Drying The Vase
After the shaping and cleaning process, it is crucial to allow the vase to dry properly before proceeding with decoration and firing. To ensure even drying, place the vase on a drying rack or a piece of plaster. Avoid direct sunlight or heat sources, as they can cause the clay to dry too quickly and crack. Depending on the thickness of the vase and environmental conditions, the drying process can take anywhere from a few days to a couple of weeks. Patience is key during this stage to prevent any potential mishaps.
- Place the vase on a drying rack or a piece of plaster for even drying.
- Avoid direct sunlight or heat sources.
- The drying process can take anywhere from a few days to a couple of weeks.
Decoration And Firing Techniques
Once the vase is completely dry, it is ready for decoration and firing. There are numerous techniques you can use to add visual interest and personal flair to your vase. Some popular options include glazing, painting, carving, or using various surface treatments like slip trailing or sgraffito. These techniques allow you to experiment with colors, textures, and patterns to make your vase truly unique.
Before firing, ensure that your vase is completely dry to avoid any cracking during the heating process. Follow the specific instructions for your clay and glaze to determine the appropriate firing temperature and duration. Place the vase in a kiln and carefully monitor the temperature to ensure a successful firing. Once the firing is complete, allow the vase to cool down slowly before removing it from the kiln.
Creating a vase on a pottery wheel is a rewarding experience that requires skill, patience, and creativity. By following the steps outlined in this guide, even beginners can create their own stunning ceramic vase. So, grab your pottery wheel, clay, and tools, and let your imagination soar as you embark on this exciting pottery adventure.
Frequently Asked Questions
How is a ceramic vase made?
To create a ceramic vase, a process known as filling is employed. First, liquid clay is poured into a meticulously crafted mould, allowing it to gently settle in order to attain the desired shape. As the clay sets, it transforms from a liquid to a solid state, gradually acquiring the sturdy form of a vase. This method not only enables the creation of intricate designs and patterns, but also ensures the resulting vase possesses a smooth and refined finish.
Is wheel pottery easy?
Wheel pottery can present some initial challenges for beginners, but with practice and patience, it can become an accessible and enjoyable technique to master. The process of wheel throwing may take some time to get the hang of, but once the basic skills and techniques are learned, one can create a wide range of beautiful and functional pottery pieces. With dedication and a willingness to learn, the art of wheel pottery can be a fulfilling and rewarding experience for aspiring potters.
How to make pottery step by step?
Pottery making is a complex yet rewarding process that requires careful attention to detail. The first step is designing your pottery, envisioning the shape, size, and style you want to create. Once your design is finalized, it’s time to move on to the making stage where you’ll start creating your pottery using various techniques such as hand-building or throwing on a wheel.
After the making stage, your pottery needs to go through a drying process to remove any remaining moisture. This is a crucial step as it helps prevent cracking or warping during firing. Once dry, it’s time to trim and clean up your pottery to refine its shape and remove any imperfections. Next comes the bisque firing, which involves placing your pottery in a kiln to harden it further and prepare it for glazing.
Glazing is a transformative step where you’ll apply a layer of glaze to your pottery, adding color, texture, and protection. After glazing, your pottery goes through the final glaze firing to fuse the glaze with the clay and achieve a glossy finish. Patience and skill are key in pottery making, but the end result is a beautiful and functional piece of art that brings joy to both the creator and the beholder.
What are some tips for centering clay on a pottery wheel when making a vase?
When centering clay on a pottery wheel to make a vase, there are a few key tips to keep in mind. First, it’s important to ensure that the wheel head is clean and free from any clay residue. This will prevent the clay from sticking and make it easier to center. Next, moisten your hands with water before placing the clay on the wheel. This helps create a slip, making it easier for the clay to adhere to the wheel head. Once the clay is on the wheel, use your dominant hand to apply gentle pressure at the top of the clay while your other hand supports the bottom. This pressure and support will help stabilize the clay as you begin to center it.
While centering the clay, it’s crucial to maintain a slow and steady speed on the wheel. Gradually increase the wheel’s speed as you gain more control and confidence with centering. Apply consistent pressure with your hands to gently push the clay towards the center of the wheel head. If the clay starts to wobble, slow down the wheel speed and readjust your hands. Remember to check the clay’s positioning by examining its profile from different angles to ensure it is properly centered. With practice and patience, you’ll develop a knack for centering clay on the pottery wheel to create beautiful vases.