How to Apply Tile Adhesive
To apply tile adhesive correctly, start by preparing the surface where the tiles will be installed.
Ensure it is clean, dry, and free of any dirt or debris that could affect the adhesive’s bonding.
Next, mix the adhesive according to the manufacturer’s instructions, using the proper ratio of adhesive powder to water.
Apply a thin layer of adhesive to the back of each individual tile, completely covering its surface.
Press the tile firmly onto the wall, ensuring there is a small gap between the tile and the wall for grout.
Continue this process, working in small sections, until the wall is fully covered with adhesive and tiles.
Allow the adhesive to dry and cure as per the manufacturer’s instructions before grouting.
Following these steps will help prevent water damage, cracking tiles, and ensure a professional and long-lasting tile installation.
Check this out:
Did You Know?
1. Tile adhesive, also known as thinset or mortar, was invented in the late 1800s by an English engineer named A. C. Davison.
2. The first tile adhesives were made from a mixture of Portland cement, sand, and water.
3. Before tile adhesive was invented, ceramic tiles were typically installed using traditional methods such as thick bed mortar, which required a longer drying time.
4. The first commercial tile adhesive was introduced to the market in the 1930s and revolutionized the tile installation process due to its faster drying time and improved bond strength.
5. Tile adhesives today are typically polymer-modified, meaning they contain additives such as latex or acrylic to increase their flexibility, strength, and resistance to moisture.
Proper Tile Adhesive Application Techniques
When it comes to tiling, one of the most critical steps is applying the tile adhesive correctly. By following proper techniques, you can ensure a strong and long-lasting bond between the tiles and the surface. Here are the essential steps to apply tile adhesive effectively:
1. Prepare the surface: Before applying the adhesive, ensure that the surface is clean, dry, and free from dust and debris. It is important to remove any loose paint, wallpaper, or old adhesive. A smooth and even surface ensures that the tiles adhere properly.
2. Choose the right adhesive: Different types of tiles require different adhesives. Make sure to select the adhesive that is suitable for the type of tiles you are using and the surface you are tiling. Consult the manufacturer’s instructions or seek advice from a professional if you are unsure.
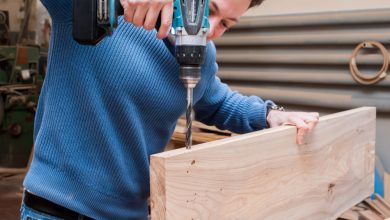
3. Mix the adhesive: Follow the manufacturer’s instructions to mix the adhesive. Use a mixing bucket and a drill with a mixing attachment to achieve a smooth and uniform consistency. Mix only the amount of adhesive you can use within the specified working time to prevent it from drying out.
4. Apply the adhesive: Use a notched trowel to evenly spread the adhesive onto the surface, working in small sections at a time. Hold the trowel at a 45-degree angle and apply enough pressure to ensure proper coverage. The adhesive should create ridges that are roughly 1/8 inch deep.
5. Comb the adhesive: Once the adhesive is applied, use the notched edge of the trowel to comb through the ridges. This helps create an even layer and ensures good contact between the tiles and the adhesive. Comb in one direction only to prevent air pockets from forming.
6. Allow for curing time: After applying the adhesive, refer to the manufacturer’s instructions to determine the correct curing time. It is crucial to allow enough time for the adhesive to set and dry before grouting or putting any weight on the tiles. Failure to do so may result in tiles that do not adhere properly or move after installation.
- Prepare the surface (clean, dry, and free from dust and debris)
- Choose the right adhesive (suitable for the type of tiles)
- Mix the adhesive according to the instructions
- Apply the adhesive with a notched trowel (evenly spread in small sections)
- Comb the adhesive with the notched edge of the trowel (create an even layer)
- Allow for proper curing time before grouting or putting weight on the tiles.
“Proper application of tile adhesive is crucial for creating a strong and durable bond between the tiles and the surface.”
Applying Tile Adhesive To Individual Tiles
In some cases, applying adhesive directly to the back of individual tiles may be necessary. This is especially true for smaller tiles or tiles with complex patterns that require precise placement. Here are the steps to properly apply adhesive to individual tiles:
-
Prepare the tiles: Ensure that the tiles are clean and free from any dust or debris. Wipe them down with a damp cloth if necessary. Additionally, check the back of the tiles for any irregularities or uneven surfaces that may affect adhesion.
-
Apply the adhesive: Using a notched trowel, apply a thin, even layer of adhesive to the back of the tile. Make sure to cover the entire surface, leaving no gaps or voids. Use a trowel with smaller notches compared to the ones used for applying adhesive to the surface.
-
Press the tile into place: Carefully position the tile on the surface, aligning it with the surrounding tiles or the layout pattern you have planned. Apply gentle pressure to firmly press the tile into place, ensuring good contact with the adhesive.
-
Check for any gaps or excess adhesive: Once the tile is pressed into place, inspect the edges for any gaps between the tile and the wall. If there are any gaps, remove the tile and reapply adhesive to the affected areas. Also, look for any excess adhesive that may have squeezed out from under the tile. Wipe away any excess before it dries.
-
Allow for curing time: After each tile is applied, allow the adhesive to cure fully before proceeding with grouting or further tiling. Follow the manufacturer’s instructions for recommended curing time.
Ensuring Full Wall Coverage With Tile Adhesive
One common mistake in tiling is not achieving full wall coverage with tile adhesive. Insufficient coverage can lead to tiles that are insecure and prone to cracking or water damage. Here are some tips to ensure full wall coverage:
-
Use the correct trowel size: The size of the notches on the trowel determines the amount of adhesive applied. Opt for a trowel with larger notches when working with larger tiles or uneven surfaces, as it helps achieve better coverage.
-
Apply adhesive in small sections: Working in small sections at a time allows you to apply the adhesive evenly and maintain control of the coverage. This is particularly important when working with fast-drying adhesives.
-
Check for voids and gaps: After applying the adhesive, inspect the surface for any areas where the adhesive did not properly cover the wall. Apply additional adhesive to fill in any voids or gaps. Use a putty knife or a tile spacer to push the adhesive into these areas.
-
Press the tiles firmly: When placing the tiles on the adhesive, press them firmly into place to ensure good contact. This helps the adhesive spread evenly and fill any gaps or voids.
-
Use a spirit level: Periodically check the alignment of the tiles using a spirit level. This ensures that the tiles are properly adhered to the wall and helps identify any areas that may require additional adhesive or adjustment.
Remember, achieving full wall coverage with tile adhesive is crucial for the overall integrity and longevity of the tiling job.
Importance Of Minimizing Gaps Between Tiles And Walls
Minimizing gaps between tiles and walls is essential for both aesthetic and functional reasons. Not only can unsightly gaps ruin the appearance of a tiled surface, but they can also lead to water damage and other issues. Here are some reasons why minimizing gaps is important:
-
Water damage prevention: Gaps between tiles and walls can allow water to seep in, leading to damage to the underlying wall or substrate. This can result in mold and mildew growth, structural damage, and costly repairs. Properly filling the gaps with grout helps create a watertight barrier.
-
Aesthetics: Gaps between tiles can be unsightly, compromising the overall appearance of the tiled surface. By minimizing gaps, you can achieve a seamless and visually appealing finish.
-
Hygiene: Large gaps between tiles can become breeding grounds for bacteria and other microorganisms. These gaps can be difficult to clean, compromising the hygiene of the tiled area. Minimizing gaps facilitates easy cleaning and maintenance.
-
Structural stability: Properly filled gaps provide stability to the tiled surface. They help distribute the load evenly, preventing tiles from cracking or becoming loose. This is especially important in high-traffic areas or in situations where heavy objects may be placed on the tiles.
To minimize gaps, ensure that you use an appropriate grout and follow the manufacturer’s instructions for application. Properly packing and smoothing the grout into the gaps using a grout float or a rubber trowel can help achieve a consistent and professional finish.
- Use an appropriate grout
- Follow the manufacturer’s instructions for application
- Pack and smooth the grout into the gaps using a grout float or a rubber trowel
Waterproofing Tiles To Prevent Water Damage
Water damage is a common concern in areas where tiles are installed, such as bathrooms and kitchens. Waterproofing the tiles is essential to protect the underlying surfaces and prevent water damage. Here is how you can waterproof tiles:
-
Select a waterproof tile adhesive: Look for an adhesive that specifically mentions waterproofing properties. These adhesives create a barrier that prevents water from penetrating through the adhesive layer and damaging the walls or substrate.
-
Apply a waterproofing membrane: In addition to using a waterproof adhesive, consider applying a waterproofing membrane to provide extra protection. These membranes are typically applied before installing the tiles and are designed to keep water from seeping through the tiled surface.
-
Use waterproof grout: Ordinary grout can absorb water, which can lead to damage over time. Opt for a waterproof grout that is specially formulated to prevent water infiltration. This helps maintain the integrity of the tiled surface and minimizes the risk of water-related issues.
-
Seal the tiles: Once the tiles are installed and grouted, consider applying a sealant to enhance their waterproofing properties. This further protects the surface, making it easier to clean and less prone to stains or water damage.
Remember, properly waterproofing tiles is crucial to prevent water damage, promote longevity, and maintain the aesthetic appeal of tiled surfaces.
Avoiding Tiles Cracking And Poor Tilers’ Job
- Tiles cracking and a poor tiler’s job can be a costly and frustrating problem.
- A well-executed tiling job should be durable and aesthetically pleasing.
- Here are some tips to avoid tiles cracking and ensure a professional tiler’s job:
- 1. Hire a professional tiler: One of the best ways to prevent tiles cracking and ensure a high-quality job is to hire a skilled and experienced tiler.
- Professional tilers have the expertise to properly prepare the surface, select the right adhesive, and perform precise installations.
- 2. Prepare the surface properly: A poorly prepared surface can lead to unevenness and movement, causing tiles to crack or become loose over time.
- Ensure that the surface is clean, dry, and level before tiling. Any existing cracks or defects should be repaired before tiling begins.
- 3. Choose the right tiles: Different tiles have different strengths and suitability for certain applications.
- Select tiles that are appropriate for the area being tiled, considering factors such as the level of foot traffic or exposure to moisture.
- Consult with the tile manufacturer or a knowledgeable tile retailer for guidance.
- 4. Use the correct adhesive and techniques: Using the wrong adhesive or applying it incorrectly can result in tiles that do not adhere properly or are prone to cracking.
- Make sure to select the adhesive that is suitable for your tiles and the surface. Follow the manufacturer’s instructions for application carefully.
- 5. Allow for proper curing time: Rushing the curing process can compromise the strength of the adhesive and result in tiles that crack or become loose.
- Allow sufficient curing time as recommended by the manufacturer before subjecting the tiles to excessive weight or stress.
- 6. Install a shower rail: In wet areas such as showers, it is important to install a shower rail or other support to prevent movement and flexing of the tiles.
- This can help prevent cracking caused by constant weight or pressure on the tiles.
- To ensure a reliable and aesthetically pleasing tiling job, it is essential to invest in professional craftsmanship, proper surface preparation, high-quality materials, and following the correct techniques.
- Properly applying tile adhesive is crucial for a successful tiling job. By following the correct techniques, you can ensure that tiles adhere securely, minimize the risk of water damage, and prevent cracking.
- Remember to prepare the surface properly, select the right adhesive, and allow for proper curing time.
- Additionally, minimize gaps between tiles and walls, waterproof the tiles in moisture-prone areas, and hire a professional tiler if needed.
- By giving attention to these details, you can achieve a beautiful and durable tiled surface that will stand the test of time.
Frequently Asked Questions
Do you apply adhesive to tile or wall?
To ensure proper tile installation, it is crucial to follow the manufacturer’s instructions. In this case, the tile adhesive should be applied directly to the wall, not the tile itself. By spreading an even layer of adhesive on the wall, you can ensure a secure bond between the wall and the tile, eliminating any gaps or unevenness. By not adhering to these instructions and applying the adhesive directly onto each individual tile, a gap was created between the tile and the wall. This oversight compromised the integrity of the installation, potentially leading to issues such as tile movement or water penetration in the future.
What is the mixing ratio for tile adhesive?
The recommended mixing ratio for tile adhesive is approximately 2.5 parts powder to 1 part water by volume. To achieve the desired consistency, the powder should be added to clean water and mixed thoroughly until a smooth and uniform texture is obtained. It is important to use the adhesive within 5 hours of mixing, assuming the mixture is kept at room temperature. This ratio and timeframe ensure optimal performance for the tile adhesive during installation.
How do you mix tile adhesive with water?
To mix tile adhesive with water, first, make sure you have a good drill machinery with torque control and a mixing paddle attachment. This will allow for a more efficient and consistent mixing process. Attach the mixing paddle to the drill and set the torque control to a suitable level. Then, pour the appropriate amount of water into a clean bucket and gradually add the tile adhesive while the drill is running. Continuously mix the mixture until it reaches a smooth and lump-free consistency. Alternatively, for smaller projects, you can mix the tile adhesive manually using a margin trowel. However, note that this method may take longer and require more effort to achieve a consistent mix.
Is tile adhesive better than cement?
Tile adhesive is generally considered to be better than cement for several reasons. Firstly, one of the main advantages of adhesive is its ease and speed of use. Unlike cement mix, which can be a time-consuming process for laying tiles, adhesive offers a quick and fast solution. Additionally, adhesive has a strong grip on tiles, even surpassing cement in this aspect. It can also easily hold larger-sized stones, making it a versatile choice for various tile installations. Its high bonding strength is particularly beneficial when fixing tiles and marbles, providing a reliable and durable result. In contrast, cement mix tends to have relatively poor bonding strength, making adhesive a superior option for tile installations.